This box was developed by user Christine Clark in order to protect an i-Pad from a child who liked to hit the screen with a flat hand. After an unsuccessful search to find a case that would protect the screen while allowing access, this box was created.  It allows the user access to the slide bar and the Proloquo Communication app in the portrait orientation.  After a year of using this box and a behavior management program, the child was no longer hitting the i-Pad and was able to switch to a lighter weight case.
Here are the steps to build your own box:
STEP 1:
I purchased this wooden letter tray at A. C. Moore for under $10.00.  The I-Pad, in its slim case, fits
inside.  You can paint, stain, or leave it plain.  I painted it with a water resistant type of paint.


STEP 2:
I went to Home Depot and discovered the ventilated shelving.  Home Depot will cut to your length.
Item #4714 is the perfect fit after some trimming. The 4’ piece costs under $10. Home Depot may have
some scrap pieces leftover from when they trimmed shelving for a previous customer. I did get a free
piece. You may use a Dremel tool or another type of sander to smooth the edges after cutting. Home Depot sells touch up paint for vinyl coated racks if you want to touch up the rack after cutting.  You can easily slide the bar in order to unlock the I-Pad in this position.


As you can see, the plug easily fits through the handle on the wooden tray. Recharging will be easy.

STEP 3:
The next step is to provide some type of shock absorption under the iPad.  Some ideas are foam, slip resistant material used under rugs and on shelves, a small folded towel, vent register filters, etc.  In the first photo I used slip resistant material.  3 layers were needed.

In this photo I used vent register filters. Â I used 3 filters in a stack and made 2 stacks.

It is important that you don’t make the shock absorption layer too thick. Â The iPad must be lower than the side of the tray.

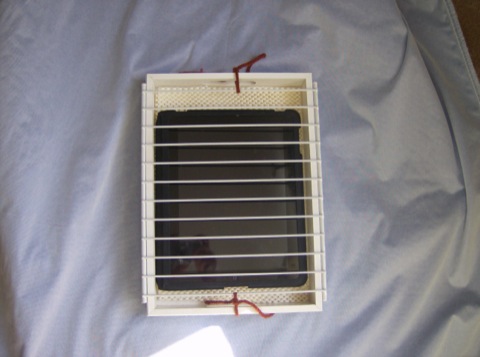
STEP 4: Â Last you want to fasten the shelving to the tray. Â How you do this will depend on the users needs.
You may have to drill several small holes in both sides of the wooden tray. A twist tie can be inserted through each hole and pulled up and around the bar on the shelving. The twist tie can be easily removed when you
need to take the I-Pad out of the case.


You can tie a string through the handle on the wooden tray and the closest cross bar on the shelving. You can drill larger holes and use chain with a padlock.


Just remember to be creative. The idea is to protect the I-Pad and allow the user to have access to it.